Difference between revisions of "Installation Misc"
Bakerboy448 (talk | contribs) |
|||
| (50 intermediate revisions by 4 users not shown) | |||
| Line 1: | Line 1: | ||
== Installation == | == Installation == | ||
=== Radarr === | === Radarr === | ||
| − | <section begin= | + | ==== OSX ==== |
| + | <section begin=radarr_osx_installation /> | ||
| + | Detailed instructions coming "soon" | ||
| + | For now please see our website for details: | ||
| + | https://radarr.video/#downloads-v3-macos | ||
| + | <section end=radarr_osx_installation /> | ||
| + | <section begin=radarr_linux_installation /> | ||
| + | ==== Debian/Ubuntu ==== | ||
===== .NET Core Install ===== | ===== .NET Core Install ===== | ||
| − | + | You'll need curl, mediainfo, and sqlite. | |
| + | <code>sudo apt install curl mediainfo sqlite3</code> | ||
====== Manual Install ====== | ====== Manual Install ====== | ||
| − | + | Note: this assumes you created a user named <code>radarr</code> | |
| − | |||
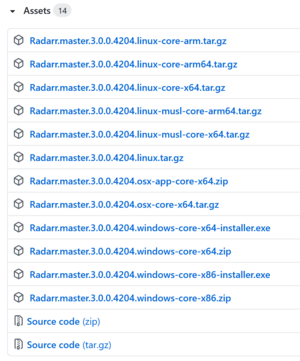
[[File:ARR Download Link Example.png|thumb|right|Example of Radarr download options]] | [[File:ARR Download Link Example.png|thumb|right|Example of Radarr download options]] | ||
| + | In the example screenshot here, you can see multiple options. Choose the option that matches your OS and processor best. For most users, this would be <code>.linux-core-x64.tar.gz</code> selected via <code>arch=x64</code> in the url. | ||
| − | Download this file onto your system: | + | For: |
| + | * ARM use <code>arch=arm</code> | ||
| + | * ARM64 use <code>arch=arm64</code> | ||
| + | * AMD64 use <code>arch=x64</code> | ||
| + | |||
| + | Download this file onto your system: (Note: The link below will target the Linux .NET Core x64 file. Replace if needed with the file you chose previously) | ||
wget --content-disposition 'http://radarr.servarr.com/v1/update/master/updatefile?os=linux&runtime=netcore&arch=x64' | wget --content-disposition 'http://radarr.servarr.com/v1/update/master/updatefile?os=linux&runtime=netcore&arch=x64' | ||
| + | * Alternatively: Go to the Radarr download page, and pick the appropriate file: https://github.com/Radarr/Radarr/releases | ||
Uncompress: | Uncompress: | ||
| − | tar -xvzf | + | tar -xvzf Radarr*.linux*.tar.gz |
| − | Move to your preferred install location (typically <code>/opt/ | + | Move to your preferred install location (typically <code>/opt/Radarr/</code> |
| − | sudo mv | + | sudo mv Radarr/ /opt |
Finally, make sure you grant the needed permission to your install directory: | Finally, make sure you grant the needed permission to your install directory: | ||
| − | sudo chown | + | sudo chown radarr:radarr /opt/Radarr |
| + | |||
| + | You can start Radarr with the following command: | ||
| + | /opt/Radarr/Radarr -nobrowser | ||
| + | <section end=radarr_linux_installation /> | ||
| − | |||
| − | |||
| − | |||
=== Sonarr === | === Sonarr === | ||
| − | + | ==== OSX ==== | |
| − | + | <section begin=sonarr_osx_installation /> | |
| − | |||
| − | |||
| − | |||
| − | |||
| − | |||
| − | |||
| − | |||
| − | |||
| − | |||
| − | |||
| − | |||
| − | |||
| − | |||
| − | ==== | ||
| − | <section begin= | ||
<ol> | <ol> | ||
| − | <li>After downloading Sonarr V3 from [https://services.sonarr.tv/v1/download/phantom-develop/latest?version=3&os=macos&installer=true here]The <code>zip</code> file will be located in your downloads directory.</li> | + | <li>After downloading Sonarr V3 from [https://services.sonarr.tv/v1/download/phantom-develop/latest?version=3&os=macos&installer=true here]. The <code>zip</code> file will be located in your downloads directory.</li> |
| − | <li>After the | + | <li>After the download has finished you'll need to unzip the file from there you'll have a '''Sonarr.app''' in your downloads folder simply move the '''Sonarr.app''' to your Applications directory.</li> |
[[File:Move-sonarr-to-applications.gif|center|frameless|750x750px]] | [[File:Move-sonarr-to-applications.gif|center|frameless|750x750px]] | ||
<li> From there if you go to your launch pad you'll notice that Sonarr is now in there, double click on Sonarr</li> | <li> From there if you go to your launch pad you'll notice that Sonarr is now in there, double click on Sonarr</li> | ||
<li> You'll probably get a pop up that says "Sonarr.app" cannot be opened because the developer cannot be verified.</li> | <li> You'll probably get a pop up that says "Sonarr.app" cannot be opened because the developer cannot be verified.</li> | ||
| − | [[File:sonarr-developer-cannot-be-verified.png| | + | [[File:sonarr-developer-cannot-be-verified.png|center|frameless|250px]] |
| − | <li> | + | <li> Don't fret we can get this fixed.</li> |
<ol> | <ol> | ||
<li>Click on System Preferences in your dock</li> | <li>Click on System Preferences in your dock</li> | ||
| Line 57: | Line 57: | ||
<li> Click Open </li> | <li> Click Open </li> | ||
</ol> | </ol> | ||
| − | <li> Now since Sonarr uses the Mono Framework Version 5.20 or later if you do not already have that installed you'll | + | <li> Now since Sonarr uses the Mono Framework Version 5.20 or later if you do not already have that installed you'll receive a pop up like this</li> |
| − | [[File:sonarr-cannot-launch-sonarr-mono.png| | + | [[File:sonarr-cannot-launch-sonarr-mono.png|center|frameless|250px]] |
<ul> | <ul> | ||
<li>Note: If Mono is already installed skip these steps</li> | <li>Note: If Mono is already installed skip these steps</li> | ||
| Line 70: | Line 70: | ||
<li> Now browse to <code>http://localhost:8989</code></li> | <li> Now browse to <code>http://localhost:8989</code></li> | ||
</ol> | </ol> | ||
| − | Now you're all set Sonarr is now up and running on your system | + | Now you're all set Sonarr is now up and running on your system. |
| − | <section end= | + | <section end=sonarr_osx_installation /> |
| + | <section begin=sonarr_linux_installation /> | ||
| + | |||
| + | ==== Debian/Ubuntu ==== | ||
| + | |||
| + | [https://sonarr.tv/#downloads-v3-linux-ubuntu Please see our website] | ||
| + | |||
| + | Manual installs methods are unsupported and you'll need to determine the process yourself. | ||
| + | |||
| + | <section end="sonarr_linux_installation" /> | ||
| + | |||
| + | === Lidarr === | ||
| + | ==== OSX ==== | ||
| + | <section begin=lidarr_osx_installation /> | ||
| + | Detailed instructions coming "soon" | ||
| + | For now please see our website for details: | ||
| + | https://lidarr.audio/#downloads-v1-macos | ||
| + | <section end=lidarr_osx_installation /> | ||
| + | |||
| + | <section begin=lidarr_linux_installation /> | ||
| + | ==== Debian/Ubuntu ==== | ||
| + | ===== .NET Core Install ===== | ||
| + | You'll need curl, mediainfo, chromaprint, and sqlite. | ||
| + | <code>sudo apt install curl mediainfo sqlite3 libchromaprint-tools</code> | ||
| + | |||
| + | ====== Manual Install ====== | ||
| + | Note: this assumes you created a user named <code>lidarr</code> | ||
| + | |||
| + | [[File:ARR Download Link Example.png|thumb|right|Example of Lidarr download options]] | ||
| + | In the example screenshot here, you can see multiple options. Choose the option that matches your OS and processor best. For most users, this would be <code>.linux-core-x64.tar.gz</code> selected via <code>arch=x64</code> in the url. | ||
| + | |||
| + | For: | ||
| + | * ARM use <code>arch=arm</code> | ||
| + | * ARM64 use <code>arch=arm64</code> | ||
| + | * AMD64 use <code>arch=x64</code> | ||
| + | |||
| + | Download this file onto your system: (Note: The link below will target the Linux .NET Core x64 file. Replace if needed with the file you chose previously) | ||
| + | wget --content-disposition 'http://lidarr.servarr.com/v1/update/develop/updatefile?os=linux&runtime=netcore&arch=x64' | ||
| + | * Alternatively: Go to the Lidarr download page, and pick the appropriate file: https://github.com/Lidarr/Lidarr/releases | ||
| + | |||
| + | Uncompress: | ||
| + | tar -xvzf Lidarr*.linux*.tar.gz | ||
| + | Move to your preferred install location (typically <code>/opt/Lidarr/</code> | ||
| + | sudo mv Lidarr/ /opt | ||
| + | Finally, make sure you grant the needed permission to your install directory: | ||
| + | sudo chown lidarr:lidarr /opt/Lidarr | ||
| + | |||
| + | You can start Lidarr with the following command: | ||
| + | /opt/Lidarr/Lidarr -nobrowser -data=path/to/app/data | ||
| + | <section end=lidarr_linux_installation /> | ||
| + | |||
| + | === Readarr === | ||
| + | ==== OSX ==== | ||
| + | <section begin=readarr_osx_installation /> | ||
| + | Readarr is in a pre-alpha state. Instructions will be built once Readarr is stable (i.e. alpha). | ||
| + | <section end=readarr_osx_installation /> | ||
| + | ==== Linux ==== | ||
| + | <section begin=readarr_linux_installation /> | ||
| + | ==== Debian/Ubuntu ==== | ||
| + | |||
| + | ===== .NET Core Install ===== | ||
| + | You'll need curl and sqlite. | ||
| + | <code>sudo apt install curl sqlite3</code> | ||
| + | |||
| + | ====== Manual Install ====== | ||
| + | Go to the Readarr discord and locate the binaries | ||
| + | |||
| + | Note: this assumes you created a user named <code>readarr</code> | ||
| + | |||
| + | Download this file onto your system: | ||
| + | wget --content-disposition '{Readarr is pre-alpha; link hidden from the public}' | ||
| + | Uncompress: | ||
| + | tar -xvzf Readarr*.linux-core-x64.tar.gz | ||
| + | Move to your preferred install location (typically <code>/opt/Readarr/</code> | ||
| + | sudo mv Readarr/ /opt | ||
| + | Finally, make sure you grant the needed permission to your install directory: | ||
| + | sudo chown readarr:readarr /opt/Readarr | ||
| + | |||
| + | You can start Readarr with the following command: | ||
| + | /opt/Readarr/Readarr -nobrowser | ||
| + | <section end=readarr_linux_ubuntu_NetCore_manual_installation /> | ||
| + | |||
| + | === Prowlarr === | ||
| + | ==== OSX ==== | ||
| + | <section begin=prowlarr_osx_installation /> | ||
| + | Detailed instructions coming "soon" | ||
| + | For now please see our website for details: | ||
| + | https://prowlarr.com/#downloads-v3-macos | ||
| + | <section end=prowlarr_osx_installation /> | ||
| + | <section begin=prowlarr_linux_installation /> | ||
| + | ==== Debian/Ubuntu ==== | ||
| + | ===== .NET Core Install ===== | ||
| + | You'll need curl and sqlite. | ||
| + | <code>sudo apt install curl sqlite3</code> | ||
| + | |||
| + | ====== Manual Install ====== | ||
| + | Note: this assumes you created a user named <code>prowlarr</code> | ||
| + | In the example screenshot here, you can see multiple options. Choose the option that matches your OS and processor best. For most users, this would be <code>.linux-core-x64.tar.gz</code> selected via <code>arch=x64</code> in the url. | ||
| + | |||
| + | For: | ||
| + | * ARM use <code>arch=arm</code> | ||
| + | * ARM64 use <code>arch=arm64</code> | ||
| + | * AMD64 use <code>arch=x64</code> | ||
| + | |||
| + | Download this file onto your system: (Note: The link below will target the Linux .NET Core x64 file. Replace if needed with the file you chose previously) | ||
| + | wget --content-disposition 'https://prowlarr.servarr.com/v1/update/nightly/updatefile?os=linux&runtime=netcore&arch=x64' | ||
| + | Uncompress: | ||
| + | tar -xvzf Prowlarr*.linux*.tar.gz | ||
| + | Move to your preferred install location (typically <code>/opt/Prowlarr/</code> | ||
| + | sudo mv Prowlarr/ /opt | ||
| + | Finally, make sure you grant the needed permission to your install directory: | ||
| + | sudo chown prowlarr:prowlarr /opt/Prowlarr | ||
| + | |||
| + | You can start Prowlarr with the following command: | ||
| + | /opt/Prowlarr/Prowlarr -nobrowser | ||
| + | <section end=prowlarr_linux_installation /> | ||
| + | |||
| + | == Code Blocks == | ||
| + | === Radarr === | ||
| + | ==== Preparing the Unit Service File ==== | ||
| + | <section begin=radarr_installation_unit_service_file /> | ||
| + | [Unit] | ||
| + | Description=Radarr Daemon | ||
| + | After=syslog.target network.target | ||
| + | |||
| + | [Service] | ||
| + | # Change the user and group variables here. | ||
| + | User=radarr | ||
| + | Group=radarr | ||
| + | |||
| + | Type=simple | ||
| + | #Update the data path | ||
| + | ExecStart=/opt/Radarr/Radarr -nobrowser -data=/path/to/appdata/for/Radarr/ | ||
| + | |||
| + | TimeoutStopSec=20 | ||
| + | KillMode=process | ||
| + | Restart=always | ||
| + | |||
| + | [Install] | ||
| + | WantedBy=multi-user.target | ||
| + | <section end=radarr_installation_unit_service_file /> | ||
| + | |||
| + | === Sonarr === | ||
| + | ==== Preparing the Unit Service File ==== | ||
| + | <section begin=sonarr_installation_unit_service_file /> | ||
| + | Manual installs methods are unsupported and you'll need to determine the process yourself. | ||
| + | <section end=sonarr_installation_unit_service_file /> | ||
| + | === Lidarr === | ||
| + | ==== Preparing the Unit Service File ==== | ||
| + | <section begin=lidarr_installation_unit_service_file /> | ||
| + | [Unit] | ||
| + | Description=Lidarr Daemon | ||
| + | After=syslog.target network.target | ||
| + | |||
| + | [Service] | ||
| + | # Change the user and group variables here. | ||
| + | User=lidarr | ||
| + | Group=lidarr | ||
| + | |||
| + | Type=simple | ||
| + | |||
| + | # NetCore install: | ||
| + | # Update the data path | ||
| + | ExecStart=/opt/Lidarr/Lidarr -nobrowser -data=/path/to/appdata/for/Lidarr/ | ||
| + | |||
| + | TimeoutStopSec=20 | ||
| + | KillMode=process | ||
| + | Restart=always | ||
| + | |||
| + | [Install] | ||
| + | WantedBy=multi-user.target | ||
| + | <section end=lidarr_installation_unit_service_file /> | ||
| + | === Readarr === | ||
| + | ==== Preparing the Unit Service File ==== | ||
| + | <section begin=readarr_installation_unit_service_file /> | ||
| + | [Unit] | ||
| + | Description=Readarr Daemon | ||
| + | After=syslog.target network.target | ||
| + | |||
| + | [Service] | ||
| + | # Change the user and group variables here. | ||
| + | User=readarr | ||
| + | Group=readarr | ||
| + | |||
| + | Type=simple | ||
| + | |||
| + | # NetCore install: | ||
| + | # Update the data path | ||
| + | ExecStart=/opt/Readarr/Readarr -nobrowser -data=/path/to/appdata/for/Readarr/ | ||
| + | |||
| + | TimeoutStopSec=20 | ||
| + | KillMode=process | ||
| + | Restart=always | ||
| + | |||
| + | [Install] | ||
| + | WantedBy=multi-user.target | ||
| + | <section end=readarr_installation_unit_service_file /> | ||
| + | |||
| + | === Prowlarr === | ||
| + | ==== Preparing the Unit Service File ==== | ||
| + | <section begin=prowlarr_installation_unit_service_file /> | ||
| + | [Unit] | ||
| + | Description=Prowlarr Daemon | ||
| + | After=syslog.target network.target | ||
| + | |||
| + | [Service] | ||
| + | # Change the user and group variables here. | ||
| + | User=prowlarr | ||
| + | Group=prowlarr | ||
| + | |||
| + | Type=simple | ||
| + | #Update the data path | ||
| + | ExecStart=/opt/Prowlarr/Prowlarr -nobrowser -data=/path/to/appdata/for/Prowlarr/ | ||
| + | |||
| + | TimeoutStopSec=20 | ||
| + | KillMode=process | ||
| + | Restart=always | ||
| + | |||
| + | [Install] | ||
| + | WantedBy=multi-user.target | ||
| + | <section end=prowlarr_installation_unit_service_file /> | ||
Latest revision as of 23:29, 21 May 2021
Installation
Radarr
OSX
Detailed instructions coming "soon" For now please see our website for details: https://radarr.video/#downloads-v3-macos
Debian/Ubuntu
.NET Core Install
You'll need curl, mediainfo, and sqlite.
sudo apt install curl mediainfo sqlite3
Manual Install
Note: this assumes you created a user named radarr
In the example screenshot here, you can see multiple options. Choose the option that matches your OS and processor best. For most users, this would be .linux-core-x64.tar.gz selected via arch=x64 in the url.
For:
- ARM use
arch=arm - ARM64 use
arch=arm64 - AMD64 use
arch=x64
Download this file onto your system: (Note: The link below will target the Linux .NET Core x64 file. Replace if needed with the file you chose previously)
wget --content-disposition 'http://radarr.servarr.com/v1/update/master/updatefile?os=linux&runtime=netcore&arch=x64'
- Alternatively: Go to the Radarr download page, and pick the appropriate file: https://github.com/Radarr/Radarr/releases
Uncompress:
tar -xvzf Radarr*.linux*.tar.gz
Move to your preferred install location (typically /opt/Radarr/
sudo mv Radarr/ /opt
Finally, make sure you grant the needed permission to your install directory:
sudo chown radarr:radarr /opt/Radarr
You can start Radarr with the following command:
/opt/Radarr/Radarr -nobrowser
Sonarr
OSX
- After downloading Sonarr V3 from here. The
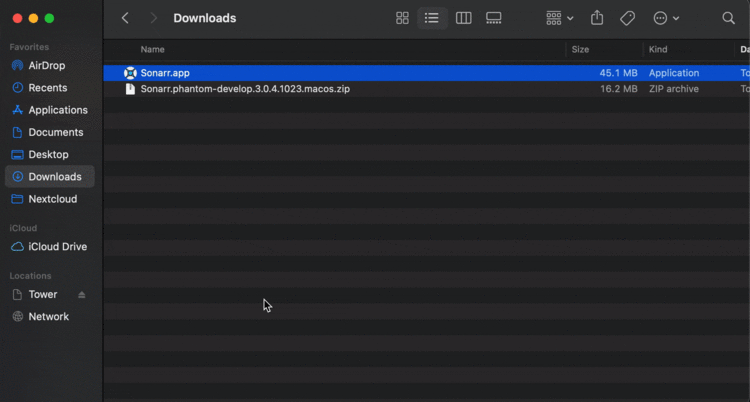
zipfile will be located in your downloads directory. - After the download has finished you'll need to unzip the file from there you'll have a Sonarr.app in your downloads folder simply move the Sonarr.app to your Applications directory.
- From there if you go to your launch pad you'll notice that Sonarr is now in there, double click on Sonarr
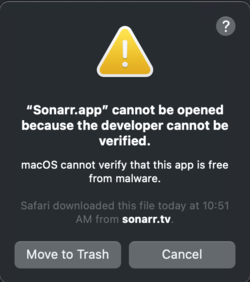
- You'll probably get a pop up that says "Sonarr.app" cannot be opened because the developer cannot be verified.
- Don't fret we can get this fixed.
- Click on System Preferences in your dock
- Click Security and Privacy
- Click Open Anyways
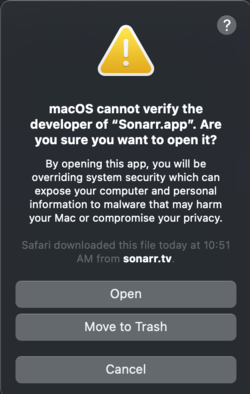
- You'll get a pop up that looks something like this:
- Click Open
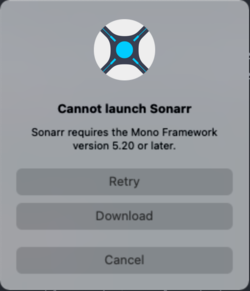
- Now since Sonarr uses the Mono Framework Version 5.20 or later if you do not already have that installed you'll receive a pop up like this
- Note: If Mono is already installed skip these steps
- Click Download
- Safari (or default browser) will now open up to the Mono Project for macOS. Click Download mono (Stable channel)
- Once the download is complete go to your downloads folder and click the new pkg file that was downloaded and install it
- After installation is complete go back and reopen Sonarr
- Now browse to
http://localhost:8989
Now you're all set Sonarr is now up and running on your system.
Debian/Ubuntu
Manual installs methods are unsupported and you'll need to determine the process yourself.
Lidarr
OSX
Detailed instructions coming "soon" For now please see our website for details: https://lidarr.audio/#downloads-v1-macos
Debian/Ubuntu
.NET Core Install
You'll need curl, mediainfo, chromaprint, and sqlite.
sudo apt install curl mediainfo sqlite3 libchromaprint-tools
Manual Install
Note: this assumes you created a user named lidarr
In the example screenshot here, you can see multiple options. Choose the option that matches your OS and processor best. For most users, this would be .linux-core-x64.tar.gz selected via arch=x64 in the url.
For:
- ARM use
arch=arm - ARM64 use
arch=arm64 - AMD64 use
arch=x64
Download this file onto your system: (Note: The link below will target the Linux .NET Core x64 file. Replace if needed with the file you chose previously)
wget --content-disposition 'http://lidarr.servarr.com/v1/update/develop/updatefile?os=linux&runtime=netcore&arch=x64'
- Alternatively: Go to the Lidarr download page, and pick the appropriate file: https://github.com/Lidarr/Lidarr/releases
Uncompress:
tar -xvzf Lidarr*.linux*.tar.gz
Move to your preferred install location (typically /opt/Lidarr/
sudo mv Lidarr/ /opt
Finally, make sure you grant the needed permission to your install directory:
sudo chown lidarr:lidarr /opt/Lidarr
You can start Lidarr with the following command:
/opt/Lidarr/Lidarr -nobrowser -data=path/to/app/data
Readarr
OSX
Readarr is in a pre-alpha state. Instructions will be built once Readarr is stable (i.e. alpha).
Linux
Debian/Ubuntu
.NET Core Install
You'll need curl and sqlite.
sudo apt install curl sqlite3
Manual Install
Go to the Readarr discord and locate the binaries
Note: this assumes you created a user named readarr
Download this file onto your system:
wget --content-disposition '{Readarr is pre-alpha; link hidden from the public}'
Uncompress:
tar -xvzf Readarr*.linux-core-x64.tar.gz
Move to your preferred install location (typically /opt/Readarr/
sudo mv Readarr/ /opt
Finally, make sure you grant the needed permission to your install directory:
sudo chown readarr:readarr /opt/Readarr
You can start Readarr with the following command:
/opt/Readarr/Readarr -nobrowser
Prowlarr
OSX
Detailed instructions coming "soon" For now please see our website for details: https://prowlarr.com/#downloads-v3-macos
Debian/Ubuntu
.NET Core Install
You'll need curl and sqlite.
sudo apt install curl sqlite3
Manual Install
Note: this assumes you created a user named prowlarr
In the example screenshot here, you can see multiple options. Choose the option that matches your OS and processor best. For most users, this would be .linux-core-x64.tar.gz selected via arch=x64 in the url.
For:
- ARM use
arch=arm - ARM64 use
arch=arm64 - AMD64 use
arch=x64
Download this file onto your system: (Note: The link below will target the Linux .NET Core x64 file. Replace if needed with the file you chose previously)
wget --content-disposition 'https://prowlarr.servarr.com/v1/update/nightly/updatefile?os=linux&runtime=netcore&arch=x64'
Uncompress:
tar -xvzf Prowlarr*.linux*.tar.gz
Move to your preferred install location (typically /opt/Prowlarr/
sudo mv Prowlarr/ /opt
Finally, make sure you grant the needed permission to your install directory:
sudo chown prowlarr:prowlarr /opt/Prowlarr
You can start Prowlarr with the following command:
/opt/Prowlarr/Prowlarr -nobrowser
Code Blocks
Radarr
Preparing the Unit Service File
[Unit]
Description=Radarr Daemon
After=syslog.target network.target

[Service]
# Change the user and group variables here.
User=radarr
Group=radarr

Type=simple
#Update the data path
ExecStart=/opt/Radarr/Radarr -nobrowser -data=/path/to/appdata/for/Radarr/

TimeoutStopSec=20
KillMode=process
Restart=always

[Install]
WantedBy=multi-user.target
Sonarr
Preparing the Unit Service File
Manual installs methods are unsupported and you'll need to determine the process yourself.
Lidarr
Preparing the Unit Service File
[Unit]
Description=Lidarr Daemon
After=syslog.target network.target

[Service]
# Change the user and group variables here.
User=lidarr
Group=lidarr

Type=simple

# NetCore install:
# Update the data path
ExecStart=/opt/Lidarr/Lidarr -nobrowser -data=/path/to/appdata/for/Lidarr/

TimeoutStopSec=20
KillMode=process
Restart=always

[Install]
WantedBy=multi-user.target
Readarr
Preparing the Unit Service File
[Unit]
Description=Readarr Daemon
After=syslog.target network.target

[Service]
# Change the user and group variables here.
User=readarr
Group=readarr

Type=simple

# NetCore install:
# Update the data path
ExecStart=/opt/Readarr/Readarr -nobrowser -data=/path/to/appdata/for/Readarr/

TimeoutStopSec=20
KillMode=process
Restart=always

[Install]
WantedBy=multi-user.target
Prowlarr
Preparing the Unit Service File
[Unit]
Description=Prowlarr Daemon
After=syslog.target network.target

[Service]
# Change the user and group variables here.
User=prowlarr
Group=prowlarr

Type=simple
#Update the data path
ExecStart=/opt/Prowlarr/Prowlarr -nobrowser -data=/path/to/appdata/for/Prowlarr/

TimeoutStopSec=20
KillMode=process
Restart=always

[Install]
WantedBy=multi-user.target
