Sonarr Installation
Installing
Windows
Please see the the Sonarr website for the Windows installer.
OSX
- After downloading Sonarr V3 from here. The
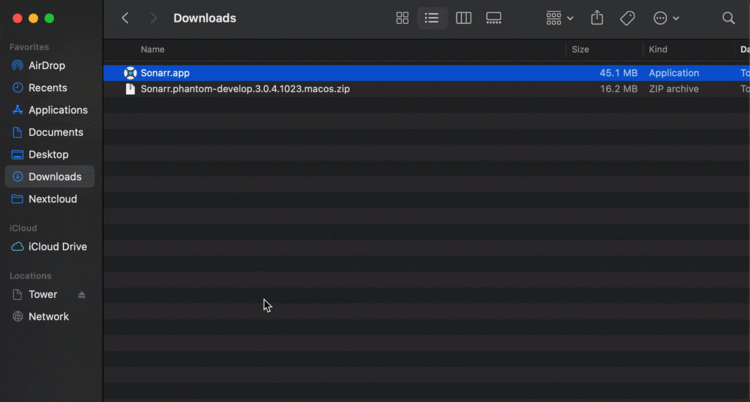
zipfile will be located in your downloads directory. - After the download has finished you'll need to unzip the file from there you'll have a Sonarr.app in your downloads folder simply move the Sonarr.app to your Applications directory.
- From there if you go to your launch pad you'll notice that Sonarr is now in there, double click on Sonarr
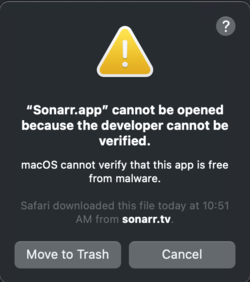
- You'll probably get a pop up that says "Sonarr.app" cannot be opened because the developer cannot be verified.
- Don't fret we can get this fixed.
- Click on System Preferences in your dock
- Click Security and Privacy
- Click Open Anyways
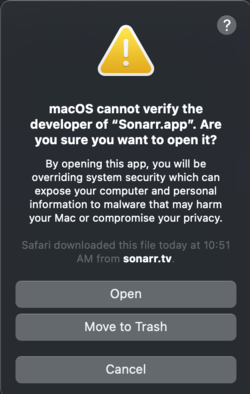
- You'll get a pop up that looks something like this:
- Click Open
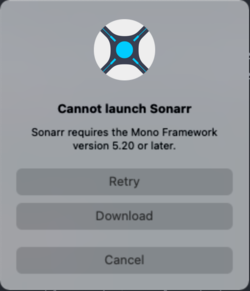
- Now since Sonarr uses the Mono Framework Version 5.20 or later if you do not already have that installed you'll receive a pop up like this
- Note: If Mono is already installed skip these steps
- Click Download
- Safari (or default browser) will now open up to the Mono Project for macOS. Click Download mono (Stable channel)
- Once the download is complete go to your downloads folder and click the new pkg file that was downloaded and install it
- After installation is complete go back and reopen Sonarr
- Now browse to
http://localhost:8989
Now you're all set Sonarr is now up and running on your system.
Linux
Debian/Ubuntu
Manual installs methods are unsupported and you'll need to determine the process yourself.
Auto Start Using Systemd
Most modern Linux distributions have switched to systemd, which involves a simple unit service file which gets enabled and started. It is important to remember that in Linux, capitalization matters. User account names and Group names are typically all lowercase, as are the directory structures mapped to them as part of the home directory.
Preparing the Unit Service File
Several items may need to be changed to match your installation:
Usershould match the service account that sonarr will run as.Groupshould match the service account group that sonarr will run as.ExecStarthas several items that should match your installation/opt/Sonarr/Sonarr- Executable Path Default location is
/opt/Sonarr/Sonarr, but you may need to update if you installed Sonarr elsewhere. - Data Directory Default location is
-data=/home/$USER/.config/Sonarr/, but you may need to update if you want to keep your database and settings elsewhere.
- Executable Path Default location is
The unit service file should be named Sonarr.service and the best place for it is /etc/systemd/system/. Alternative locations like /usr/lib/systemd/system/ and /lib/systemd/system/ may depend on the distribution used.
This example unit assumes that the User and Group are both sonarr, Sonarr's executable is placed in /opt/Sonarr/. Please update the data path to where you want the database, logs, and other metadata stored.
Manual installs methods are unsupported and you'll need to determine the process yourself.
Verify Directory Permissions
Ensure the User that will be running Sonarr has access to both the executable directory and data directory.
Running the command ls -lad /directory/ will show the permissions for that folder.
Example:
$ ls -lad /opt/Sonarr
drwxr-xr-x 6 sonarr sonarr 24576 Nov 28 21:30 /opt/Sonarr/
$ ls -lad /home/$User/.config/Sonarr/
drwxr-xr-x 6 sonarr sonarr 24576 Nov 28 21:30 /home/$User/.config/Sonarr/
Enabling and starting the Unit Service File
Once you have created Sonarr.service, you will want to enable the service:
sudo systemctl enable Sonarr.service
You are now ready to start Sonarr. You can do so with the start command:
sudo systemctl start Sonarr.service
If you want to verify Sonarr is running, you can run the status command:
 $ sudo systemctl status Sonarr.service
● Sonarr.service - SonarrService
   Loaded: loaded (/usr/lib/systemd/system/Sonarr.service; enabled; vendor preset: disabled)
   Active: active (running) since Tue 2017-03-07 10:23:44 PST; 5min ago
 Main PID: 19978 (Sonarr)
    Tasks: 16 (limit: 4915)
   Memory: 114.6M
      CPU: 9.331s
   CGroup: /system.slice/Sonarr.service
           └─19978 /opt/Sonarr/Sonarr -nobrowser -data=/path/to/data/.config/Sonarr/
Mar 07 10:23:44 apollo systemd[1]: Started Sonarr Service.
NGINX Reverse Proxy
A reverse proxy allows you to set up Sonarr so you can access it from the web without using the port number. Rather than mydomain.com:8989 you would use mydomain.com/Sonarr instead.
It is assumed you have NGINX installed.
Create a text file named Sonarr.conf and place it in your default NGINX App directory, typically /etc/nginx/conf.d/apps
- Sonarr Reverse Proxy
- Be sure to set your Base-URL in Sonarr
   location /sonarr {
           proxy_pass http://127.0.0.1:8989/sonarr;
           proxy_set_header X-Real-IP $remote_addr;
           proxy_set_header X-Forwarded-For $proxy_add_x_forwarded_for;
           proxy_set_header X-Forwarded-Proto $scheme;
           proxy_http_version 1.1;
           proxy_no_cache $cookie_session;
           proxy_set_header Upgrade $http_upgrade;
           proxy_set_header Connection $http_connection;
           # Allow the Sonarr API
           location /sonarr/api { auth_request off;
                   proxy_pass http://127.0.0.1:8989/sonarr/api;
           }
   }
Please note: It is important to ensure that the line proxy_set_header Connection $http_connection; is accurate. The NGINX documentation recommends setting this to Upgrade rather than $http_connection; but this will NOT work.
Once you have saved the file, test your NGINX config:
sudo nginx -t
Which should show this:
 nginx: the configuration file /etc/nginx/nginx.conf syntax is ok
 nginx: configuration file /etc/nginx/nginx.conf test is successful
Now you can have NGINX reload it's configuration to use the new file:
sudo nginx -s reload
Finally, make sure you add your URL Base to Sonarr. This should match what you have next to the word Location in the Sonarr.conf file, with the leading slash, likely this: /sonarr
The URL base can be set here: https://wiki.servarr.com/Sonarr_Settings#Host
Docker
Please refer to TRaSH's Guide.
Docker on unRAID
- Installation of Sonarr is quite simple when it comes to unRAID as they have made installing Docker containers a breeze.
Simply head on over to the community applications store on the top bar of your browser.
In the search field type in Sonarr
Select which docker image you would like to install. There are several to choose from
Depending on which container you go with will determine the steps in which you take. Some containers come preloaded with volumes mapped already. This is really up to your liking how you would like your container volumes to be laid out. It is highly recommended to follow the guide listed here for your volume mapping
Once you have selected which container you are going to go with, you will need to either create the volumes for Sonarr to be able to use or simply use the pre-filled ones. (Highly recommended to remove the pre-filled and use your own, to remove the pre-filled ones).
To create new volumes simply select the
Add another Path, Port, Variable, Label or Devicetext at the bottom above the Apply button.
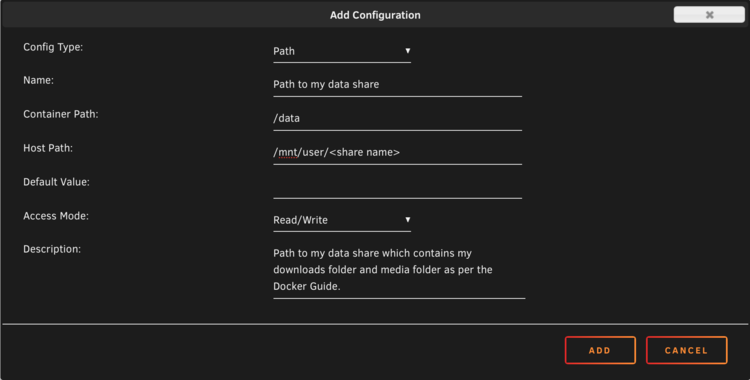
Once the new window appears you will want to use the drop down box next to Config Type: and make sure that it is set to Path.
From here you will want to fill out all pertinent information:
Name: The name of this path, this can be any unique name more like a note to know what this path is for.
Container Path: This will be the path that Sonarr will see inside the container
/datais a favorite
Host Path: This is the path to the host (unRAID) machine, This will be
/mnt/user/<Your User Share>
The last three items Default Value:, Access Mode", and Description: Can be left alone.
Click ADD
Last thing to check is to make sure Host Port for 8989 is filled in with
8989, UNLESS This port causes any conflicts with any other container. If it does please choose a different port that is not in use.
Click APPLY
Now the Sonarr's container is being downloaded, once complete simply click the OK button at the bottom of the new pop up window
Click DOCKER on the top row of your browser.
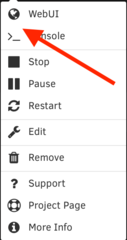
Now all you will need to do is simply left click on your newly created container and select WebUI.
Now a new browser tab should show up with Sonarr running in all its glory.
Depending on which container you select you may recieve a pop up asking you to Choose A Branch To Install when in doubt go with the Default :latest branch
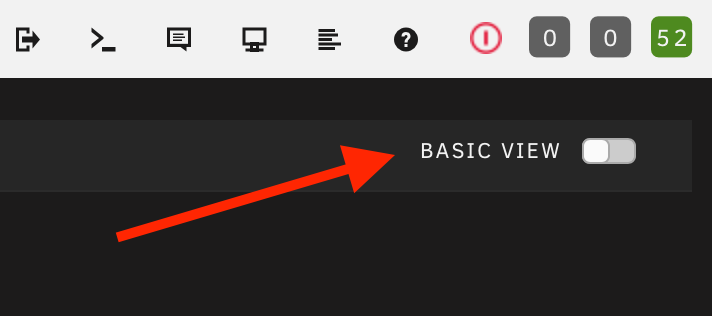
To remove the pre-filled paths simply select the toggle in the upper right from Basic to Advanced view then scroll down to the pre-filled path and click Remove
NOTE If you follow the Docker Guide you will only need one Volume path to be made as all information that Sonarr will need will be in one share /mnt/user/data
